

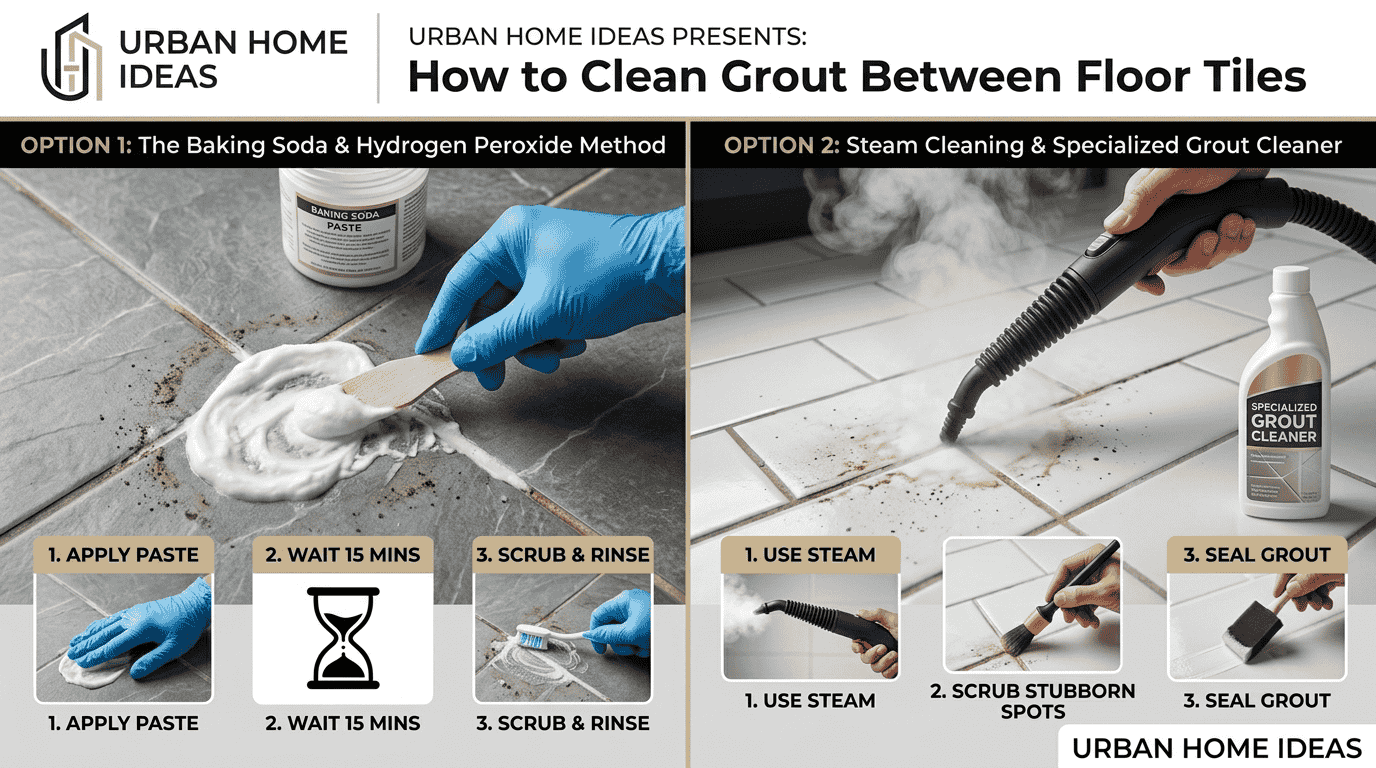
Maintaining clean floors requires attention beyond visible tile surfaces because grout lines often collect hidden dirt, dust, and spills. Learning How to Clean Grout Between Floor Tiles helps remove stubborn stains and improves overall flooring appearance.
- How To Clean Grout Between Floor Tiles Effectively
- Why Grout Between Floor Tiles Gets Dirty
- Identify Your Tile And Grout Type Before Cleaning
- Tools And Supplies Needed To Clean Grout
- Best Ways To Clean Grout Between Floor Tiles
- 1: Baking Soda And Water Paste
- 2: Baking Soda And Hydrogen Peroxide
- 3: Oxygen Bleach Cleaning
- 4: Commercial Grout Cleaners
- 5: Steam Cleaning
- How To Clean Grout Between Floor Tiles Step-By-Step
- How To Remove Tough Grout Stains
- Removing Black Or Dark Grout Stains
- Removing Grease And Kitchen Stains
- Removing Soap Scum
- Removing Hard Water Marks
- How To Clean Mold And Mildew From Grout
- Best Grout Cleaners: How To Choose The Right One
- DIY Natural Cleaners
- Chemical Grout Cleaners
- Oxygen-Based Cleaners
- Mold And Mildew Cleaners
- Eco-Friendly Options
- Cleaner Safety Considerations
- Common Mistakes When Cleaning Grout
- Using Harsh Chemicals
- Using Vinegar On Sensitive Tile Surfaces
- Scrubbing Too Hard
- Using Wrong Cleaning Tools
- Not Rinsing Properly
- Cleaning Without Testing Products
- How Often Should You Clean Floor Grout?
- How To Keep Grout Clean Longer
- Regular Maintenance Tips
- Sealing Grout After Cleaning
- Benefits Of Grout Sealing
- When To Apply Grout Sealer
- How Sealing Protects Grout
- When Cleaning Is Not Enough: Repairing Damaged Grout
- Professional Grout Cleaning
- When To Hire Professionals
- FAQs
Unlike regular mopping, grout requires specialized care because porous grout absorbs moisture and traps embedded grime. Without proper cleaning, these areas may develop mold, mildew, and unwanted buildup that affects your home’s freshness.
Using effective cleaning solutions and suitable DIY methods can restore the original look of your flooring. Options like baking soda, hydrogen peroxide, and oxygen bleach provide practical ways to refresh grout while supporting long-term maintenance.A consistent cleaning routine helps protect grout from future problems caused by moisture absorption and repeated exposure. With the right grout brush, safe products, and proper techniques, you can maintain beautiful floor tiles.
How To Clean Grout Between Floor Tiles Effectively
Grout between floor tiles requires focused cleaning because ordinary methods often leave dirty grout behind. The tiny spaces between floor tiles collect dust, spills, and stains, making proper care necessary for better appearance.
Since porous grout absorbs dirt and moisture, it can hold unwanted particles deep inside. Regular care prevents mold, mildew, and heavy buildup while maintaining a cleaner tile surface throughout living spaces.

The most effective approach combines deep cleaning, suitable cleaning solutions, and practical DIY methods. Ingredients like baking soda, hydrogen peroxide, and oxygen bleach can help remove embedded grime safely.Experienced cleaners understand that every grout condition differs. Selecting the right grout brush, applying proper techniques, and following consistent maintenance helps restore the original look while reducing future contamination risks.
Why Grout Between Floor Tiles Gets Dirty
Grout between floor tiles becomes dirty grout because it is a porous material with tiny grout pores that naturally absorbs dirt, spills, and moisture during daily household activities and regular floor usage.
Areas with heavy foot traffic collect outdoor dirt, mud, and food particles that create everyday buildup. Kitchens and bathrooms experience faster problems because trapped moisture encourages mold and mildew development.
Although regular mopping removes some surface dirt, it cannot eliminate deeper embedded grime inside dark grout lines. These cleaning challenges require targeted methods to restore appearance and maintain healthier flooring conditions.
Identify Your Tile And Grout Type Before Cleaning
Before choosing cleaning products, identify your tile type and grout type because different materials require specific care. The wrong cleaning approach may cause surface reaction, discoloration, or damage.
Sanded grout, unsanded grout, and epoxy grout have different qualities that affect maintenance. Natural stone tiles, ceramic tiles, and porcelain tiles also need suitable products for safe results.
Always perform a hidden area test before applying any cleaning solution. This confirms compatibility and prevents problems caused by harsh chemicals, protecting surfaces during the cleaning process.
Different Types Of Grout
Understanding grout material helps determine the right cleaning requirements because each option behaves differently. Sanded grout contains particles that improve strength, while unsanded grout works better for narrow spaces.
Epoxy grout offers higher resistance against stains and moisture compared with traditional options. The condition of grout joints, grout color, and porous surface affects cleaning decisions.
During tile installation, selecting suitable grout improves durability and simplifies future care. Proper maintenance practices preserve appearance and reduce the need for aggressive cleaning methods over time.
Different Tile Surfaces
Different tile surfaces need careful handling because every material reacts differently to cleaning products. Ceramic tiles are generally durable, while porcelain tiles offer strong resistance and require compatible maintenance methods.
Natural stone tiles need extra attention because harsh products can affect their appearance. Understanding flooring materials helps select proper solutions while maintaining surface protection during regular cleaning activities.
Good stone care practices preserve the natural beauty of tiles. Choosing suitable methods improves cleaning compatibility and prevents unnecessary damage while extending the life of your flooring installation.
Why Testing Cleaners Matters
Testing a cleaning solution before full application prevents unexpected issues. Apply the product on a small hidden area to observe product testing results and avoid possible damage.
A quick check reveals discoloration, surface damage, or unwanted chemical reaction before cleaning larger sections. This approach supports safer decisions and protects valuable flooring materials.
Proper testing improves tile protection and ensures grout safety during maintenance. Choosing compatible products reduces risks while creating better results without harming the surrounding tile surface.
Tools And Supplies Needed To Clean Grout
Proper clean grout results depend on having the right cleaning tools and cleaning supplies ready. A prepared setup improves efficiency while protecting floor tiles from unnecessary scratches during the cleaning process.
Essential equipment includes a grout brush, soft-bristle brush, old toothbrush, microfiber cloth, mop, and bucket. A spray bottle with warm water helps distribute products evenly across grout areas.
For deeper stains, use baking soda, hydrogen peroxide, oxygen bleach, or commercial grout cleaner options carefully. Additional tools like a steam cleaner and protective gloves improve safety during maintenance tasks.
Basic Cleaning Tools
A reliable grout brush provides targeted scrubbing power without harming surrounding tiles. A soft-bristle brush or old toothbrush works well for narrow spaces and detailed cleaning around grout areas.
Using a microfiber cloth helps remove residue after treatment, while a mop and bucket support final rinsing. A spray bottle allows controlled application of solutions.
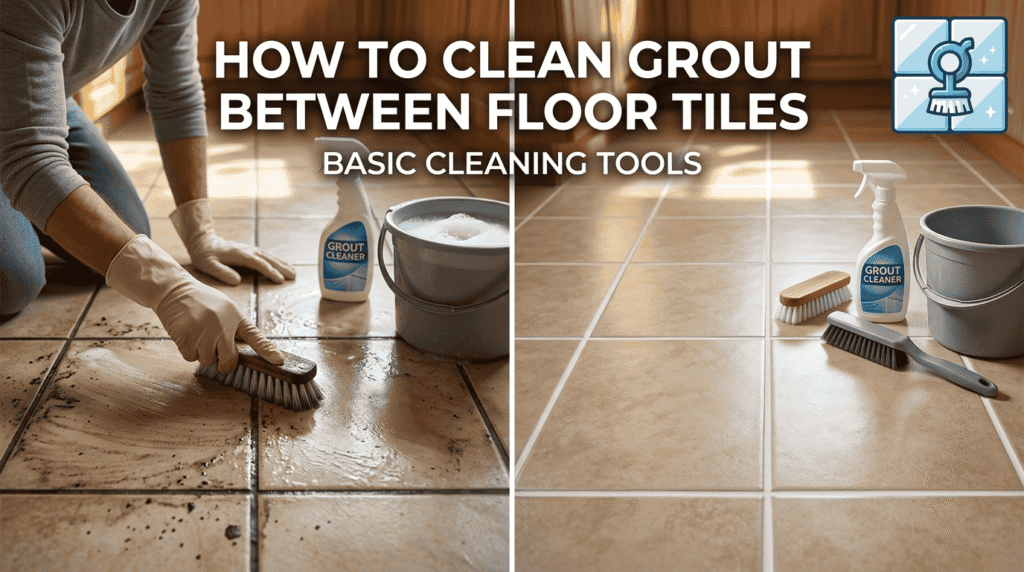
Choosing proper scrubbing tools and cleaning equipment makes regular floor maintenance easier. The right tools reduce effort while improving results during grout restoration projects.
Cleaning Products
Selecting the right cleaning products improves grout results while reducing surface risks. Common options include baking soda, hydrogen peroxide, and oxygen bleach for different cleaning situations.
For tougher problems, commercial grout cleaners provide stronger formulas. Products such as mold remover, mildew remover, and stain remover help target specific issues affecting grout appearance and cleanliness.
A suitable cleaning paste or grout brightener can refresh dull areas. Always handle cleaning chemicals carefully because proper selection protects grout condition and surrounding tile surfaces.
Best Ways To Clean Grout Between Floor Tiles
Choosing effective grout cleaning methods depends on the condition of the surface and the amount of buildup present. Different floor tiles require careful cleaning techniques to achieve safe and lasting results.
For minor issues, simple approaches support regular dirt removal and reduce visible stains. For neglected areas, stronger methods provide deep cleaning and help with complete grout restoration.
Combining homemade cleaners, commercial products, and proper maintenance creates a balanced cleaning routine. The right method depends on grout type, stain severity, and the overall condition of the flooring.
1: Baking Soda And Water Paste
A mixture of baking soda and water paste creates a simple homemade cleaner for grout lines. Its mild abrasive texture helps with gentle dirt removal.
Apply the cleaning mixture carefully over affected areas to target surface stains. Light scrubbing allows the paste to lift residue without creating unnecessary damage.
This natural solution works well for routine care and minor discoloration. Regular use can improve grout appearance while maintaining the quality of surrounding tile surfaces.
2: Baking Soda And Hydrogen Peroxide
Combining baking soda with hydrogen peroxide creates an effective grout cleaner for deeper problems. This cleaning paste helps improve stain removal while providing a gentle method for brightening grout.
The mixture works through oxygen action, breaking down trapped particles and supporting dirt breakdown inside grout spaces. Apply carefully and allow enough time for the solution to work before scrubbing.
This method is useful for deep cleaning projects where regular products cannot remove discoloration. Proper application restores grout appearance while maintaining safe conditions for surrounding tiles.
3: Oxygen Bleach Cleaning
Oxygen bleach is a powerful option for removing stubborn grout stains without using extremely harsh formulas. This powder cleaner releases oxygen-based action that supports effective deep cleaning.
When applied correctly, the solution helps with dirt removal and improves grout appearance. It works by loosening trapped particles while supporting gradual grout restoration in affected areas.
Always follow proper instructions when preparing the cleaning solution. Controlled application protects surrounding tiles while delivering better results for stained grout and long-term flooring maintenance.
4: Commercial Grout Cleaners
Commercial grout cleaners are designed for situations where regular methods cannot handle heavy stains or stubborn buildup. These specialized products provide stronger action for improving difficult grout condition.
Before using any chemical cleaner, read the manufacturer instructions carefully. Proper application prevents damage and ensures better stain removal while maintaining surrounding tile safety.
These cleaners work best when selected according to grout needs. Matching the product strength with the problem area helps achieve effective restoration without affecting the flooring surface.
5: Steam Cleaning
Steam cleaning uses a steam cleaner to apply heat and moisture into grout pores. This process helps loosen embedded dirt without depending on strong chemicals.
A brush attachment improves access to narrow grout spaces and supports better cleaning results. The method provides deep cleaning by removing trapped particles effectively.
Many homeowners prefer chemical-free cleaning because it offers a practical alternative. Proper equipment use protects surfaces while improving grout appearance and cleanliness.
How To Clean Grout Between Floor Tiles Step-By-Step
Let The Cleaner Sit
After applying the cleaner absorption process, allow enough waiting time for the solution to enter the grout pores. This helps improve penetration and loosens hidden particles.
Giving the product time allows it to loosen dirt and soften embedded stains before scrubbing. Usually, a period of 5–15 minutes improves overall cleaning effectiveness.
Avoid removing the solution too quickly because proper contact time helps achieve better results. This step prepares grout for easier cleaning while reducing unnecessary effort during scrubbing.
Scrub The Grout Lines
Begin scrubbing with a suitable grout brush or soft bristle brush to remove trapped particles. Focus carefully on grout lines where trapped dirt and discoloration appear.
Use gentle pressure to lift stains without damaging the grout structure. Controlled cleaning action produces better results than aggressive movements that may weaken surfaces.
A consistent technique with proper tools improves grout appearance. Careful scrubbing removes buildup while maintaining the durability and condition of the surrounding tile area.
Rinse Away Cleaner Residue
Use clean water for rinsing after treatment to remove leftover product. A mop, sponge, or microfiber cloth helps collect remaining residue effectively.
Complete residue removal prevents leftover cleaner from attracting more dirt. Proper rinsing supports cleaner surfaces and reduces future dirt prevention problems.
Avoid leaving cleaning products behind because residue can affect grout appearance. A thorough final rinse improves the overall cleaning outcome.
Dry And Inspect The Grout
After cleaning, allow the area to complete drying before checking the final condition. Proper moisture removal helps reveal the actual appearance of the clean grout.
Perform a careful inspection to identify any remaining stains or areas needing additional treatment. If necessary, repeat cleaning steps for better results and improved grout condition.
A final check helps evaluate the grout appearance and confirms whether the process achieved the desired outcome. Consistent attention supports better long-term maintenance and cleaner flooring.
How To Remove Tough Grout Stains
Removing tough stains requires targeted methods because dark grout stains often contain embedded grime that regular cleaning cannot remove. Different stains need specific treatments for better results.
Common issues include grease stains, kitchen stains, soap scum, and hard water marks. Using oxygen bleach, hydrogen peroxide, or commercial stain remover can improve cleaning results.
For difficult cases, steam cleaning provides another option by loosening trapped particles. Choosing the right approach depends on the stain type, grout condition, and level of buildup.
Removing Black Or Dark Grout Stains
Black stains often appear because of dark grout, discoloration, and mold buildup. These problems usually require deep cleaning methods to improve the affected areas.
A suitable whitening solution can support stain removal and help with grout restoration. Apply products carefully to avoid damaging surrounding tile surfaces.
Regular inspection helps identify early changes before stains become harder to remove. Proper maintenance keeps grout cleaner and reduces repeated discoloration problems.
Removing Grease And Kitchen Stains
Grease and kitchen stains develop from food spills and oil buildup around cooking areas. These residues require suitable cleaning products to break down stubborn marks.
Applying a proper cleaning solution or degreaser helps clean affected grout lines and supports effective stain removal. Careful treatment prevents residue from spreading.
Regular kitchen care reduces buildup and keeps grout looking cleaner. Immediate attention to spills makes future cleaning easier and protects flooring appearance.
Removing Soap Scum
Soap scum commonly appears on bathroom grout because constant moisture leaves behind residue buildup. These deposits can make grout look dull and require regular cleaning attention.
Using suitable cleaning products and gentle scrubbing helps remove unwanted residue. After treatment, proper rinse methods clear remaining particles and leave the grout looking fresher.
Consistent care prevents heavy accumulation and keeps bathroom surfaces cleaner. Maintaining proper moisture control reduces repeated buildup and supports healthier grout conditions.
Removing Hard Water Marks
Hard water creates mineral deposits that leave white residue across the grout surface. These marks appear as water stains and become difficult when buildup continues over time.
A suitable cleaning solution helps with buildup removal while improving grout appearance. Apply carefully to avoid affecting nearby tile surfaces during the cleaning process.
Regular maintenance reduces mineral accumulation and keeps grout looking cleaner. Early treatment prevents marks from becoming deeply embedded and harder to remove.
How To Clean Mold And Mildew From Grout
Mold and mildew commonly develop in grout lines located in damp areas. Spaces like bathrooms and kitchens experience higher risk because of continuous moisture exposure.
Using a suitable mold cleaner or mildew remover helps eliminate unwanted growth. Proper ventilation, regular drying, and effective moisture control reduce the chances of future problems.
Preventing fungal growth requires consistent maintenance and attention to affected areas. Keeping surfaces dry and improving airflow helps protect grout from repeated mold-related issues.
Best Grout Cleaners: How To Choose The Right One
Choosing the right grout cleaner depends on the cleaning products, tile compatibility, and the condition of the surface. Different stain type and grout condition require specific solutions for effective results.
For regular care, natural cleaners can provide gentle treatment, while commercial cleaners handle stronger problems. Oxygen-based cleaners and mold removers are useful for specialized cleaning needs.
Many homeowners prefer eco-friendly options because they contain safer ingredients. pH-neutral cleaners are also helpful when protecting sensitive surfaces and maintaining long-term grout quality.
DIY Natural Cleaners
Common household options include baking soda, hydrogen peroxide, and vinegar for simple cleaning tasks. These natural ingredients can create effective homemade solutions for mild grout problems.
Using mild cleaning methods helps maintain grout without aggressive chemicals. A carefully prepared mixture supports safe cleaning while reducing the risk of surface damage.
Natural approaches work best for routine care and light stains. Choosing appropriate ingredients helps maintain cleaner grout while protecting surrounding flooring materials.
Chemical Grout Cleaners
Chemical cleaners are designed for stronger problems where regular methods are not enough. Commercial products can help remove heavy stains and support grout restoration.
Always follow manufacturer directions to avoid unnecessary damage. Proper use improves results while maintaining surface safety during the cleaning process.
Selecting the correct formula based on grout needs ensures better performance. Strong cleaners should always be applied carefully to protect tile surfaces.
Oxygen-Based Cleaners
Oxygen bleach products work by releasing oxygen that supports oxygen cleaner activity on stained grout surfaces. This process creates a gentle whitening action while helping with stain removal.
These cleaners are useful for grout brightening and regular deep cleaning routines. They can improve dull areas while reducing visible marks without relying on extremely harsh treatments.
Selecting the correct product based on grout condition ensures better performance. Proper application helps maintain cleaner grout lines and protects surrounding tile surfaces.
Mold And Mildew Cleaners
Mold remover and mildew cleaner products help address unwanted growth caused by moisture problems. These solutions are commonly used during bathroom cleaning routines where damp conditions exist.
Maintaining proper moisture control reduces the chance of repeated issues. Effective treatment also supports fungal growth prevention by keeping grout areas cleaner and healthier.
Regular inspection and timely cleaning prevent mold from becoming difficult to manage. Using suitable products helps maintain grout appearance and improves overall surface hygiene.
Eco-Friendly Options
Eco-friendly cleaners use natural solutions and environmentally friendly approaches to reduce harsh chemical exposure. These options often include safe ingredients suitable for routine household maintenance.
Choosing greener products supports chemical reduction while maintaining effective cleaning results. They can be useful for homeowners who prefer gentle methods for grout care.
Proper selection ensures cleaning performance without unnecessary environmental impact. Balanced product choices help protect grout, tiles, and indoor spaces.
Cleaner Safety Considerations
Using products correctly is important because cleaner safety prevents unwanted problems during grout maintenance. Always consider tile protection and avoid actions that may cause grout damage.
Some products can create a chemical reaction when used incorrectly. Testing products before complete application helps identify possible issues and improves overall safety.
Wearing protective gloves provides additional protection while handling cleaning materials. Careful selection and proper usage help maintain grout quality without affecting surrounding surfaces.
Common Mistakes When Cleaning Grout
Avoiding grout cleaning mistakes helps prevent unnecessary problems caused by wrong methods, improper products, and poor maintenance decisions. Incorrect techniques may lead to grout damage and tile damage.
Using harsh chemicals, applying too much force, or selecting incorrect tools can affect surfaces. Excessive cleaning pressure may weaken grout and create long-term appearance issues.
Proper product testing, careful handling, and regular care improve grout protection. Following safe practices prevents maintenance errors and supports better surface safety during cleaning routines.
Using Harsh Chemicals
Using harsh chemicals can create problems, especially on sensitive materials. Acidic cleaners may cause grout damage when applied incorrectly to natural stone surfaces.
A strong chemical reaction can affect appearance and create tile discoloration. Proper surface protection and cleaning safety practices reduce these risks.
Always consider material compatibility before selecting products. Safe cleaning methods help preserve grout condition while preventing unwanted damage to flooring surfaces.
Using Vinegar On Sensitive Tile Surfaces
Vinegar is an acidic solution that may not suit certain sensitive tiles. Using it on natural stone can affect the grout surface through unwanted reactions.
A possible chemical reaction may lead to tile damage and reduce surface protection. Always check cleaning compatibility before applying acidic products.
Understanding tile requirements helps avoid cleaning problems. Choosing suitable methods protects grout and maintains the original appearance of flooring.
Scrubbing Too Hard
Aggressive scrubbing can create problems when too much force is applied during cleaning. Excessive pressure may affect grout lines, causing grout damage and weakening the surface.
Using unsuitable tools or harsh methods can create scratched tiles and reduce the quality of flooring. Gentle movements provide effective cleaning without harming the material.
Avoid harsh brushes and choose careful techniques for better results. Gentle cleaning protects grout structure while maintaining the appearance of surrounding tile surfaces.
Using Wrong Cleaning Tools
Choosing wrong tools can create unnecessary problems during grout maintenance. Abrasive materials and hard brushes may cause grout scratches or lead to tile damage.
Using a soft-bristle brush and proper equipment improves cleaning results. Suitable tools remove residue effectively while maintaining safe conditions for the grout surface.
Selecting the right tools supports safe cleaning practices. Proper equipment reduces risks and helps maintain clean grout without causing unwanted surface issues.
Not Rinsing Properly
Leaving behind cleaner residue can attract more dirt and create additional problems. Proper water rinsing removes leftover products and prevents residue buildup on grout surfaces.
A clean floor requires removing remaining chemicals after treatment. Effective rinsing supports better maintenance and keeps the grout surface fresh.
Skipping this step may reduce cleaning results. Complete rinsing ensures the floor remains cleaner and prevents future residue-related issues.
Cleaning Without Testing Products
Skipping product testing can create problems because every surface may react differently to a cleaning solution. Testing in a hidden area helps identify possible issues before full use.
A quick check reveals surface reaction and possible discoloration before applying products widely. This approach improves tile safety and reduces the risk of unexpected damage.
Proper testing supports grout protection and ensures safer cleaning decisions. Taking this small precaution helps maintain flooring quality while preventing avoidable maintenance problems.
How Often Should You Clean Floor Grout?
The floor grout cleaning frequency depends on several factors, including foot traffic, moisture exposure, and the location of the tiles. Areas with regular use usually require more frequent attention.
A proper maintenance schedule changes according to tile location and grout type. Sealed grout generally stays cleaner longer, while unsealed areas may collect more dirt buildup.
Kitchen floors, bathroom floors, and entryways are considered high-traffic areas that need consistent care. Regular cleaning prevents residue accumulation and helps maintain the overall grout appearance.
How To Keep Grout Clean Longer
Maintaining grout maintenance habits helps keep surfaces cleaner and reduces repeated buildup. Regular care, proper prevention methods, and consistent attention improve the appearance of clean grout over time.
Simple routines like regular cleaning and dirt prevention reduce unwanted residue. Managing moisture control also supports better grout protection and prevents problems caused by excessive exposure.
Following these steps creates long-lasting results and supports better tile floor care. A consistent approach makes grout easier to maintain and reduces the need for intensive cleaning.
Regular Maintenance Tips
Regular sweeping and vacuuming remove loose particles before they settle. Quick floor cleaning after spills helps prevent stains and keeps grout lines looking cleaner.
Immediate cleaning with mild cleaners reduces buildup and avoids excess moisture around grout areas. Consistent routine maintenance improves overall tile care.
Paying attention to daily habits makes cleaning easier. Proper maintenance protects flooring appearance and reduces the chance of stubborn residue developing.
Sealing Grout After Cleaning
Applying a grout sealer after cleaning creates a protective layer through sealing grout. This protective barrier improves moisture resistance and reduces dirt absorption.
A properly sealed surface helps with stain prevention and provides better grout protection. It also makes future cleaning easier because contaminants cannot enter the grout as quickly.
Regular sealing supports easier cleaning and long-term maintenance. This step helps preserve grout appearance while extending the life of the flooring system.
Benefits Of Grout Sealing
Grout sealing provides extra protection by creating a moisture barrier that limits water penetration. This improves stain resistance and reduces unwanted dirt prevention problems.
Sealed surfaces offer better durability because they slow down absorption. Cleaner grout lines become easier to maintain and require less frequent intensive cleaning.
Using a sealing routine improves grout performance and supports longer-lasting flooring quality. Proper protection helps maintain appearance while reducing maintenance challenges.
When To Apply Grout Sealer
Apply sealer after cleaning when the dry grout and surrounding clean surface are ready. The sealing process should be included in a regular maintenance routine.
Correct timing improves grout protection and ensures better results. Applying too early can reduce effectiveness because moisture may remain inside the grout.
Following proper application timing helps create a stronger protective layer. This improves grout condition and supports better long-term care.
How Sealing Protects Grout
Sealed grout reduces absorption by creating a protective surface that improves moisture protection. This barrier helps prevent water from entering grout and reduces future maintenance issues.
A sealed surface provides better dirt resistance and supports stain prevention by limiting the materials that can penetrate the grout. This keeps grout cleaner for longer periods.
Proper sealing increases grout durability and supports a longer lifespan. Regular care combined with sealing helps maintain appearance and reduces the need for repeated deep cleaning.
When Cleaning Is Not Enough: Repairing Damaged Grout
Sometimes cleaning cannot solve deeper issues because damaged grout may have structural problems. Cracked grout, crumbling grout, or missing grout requires more than surface treatment.
When grout deterioration continues, cleaning limitations become clear. Proper grout repair and regrouting can restore damaged areas while improving moisture prevention and tile protection.
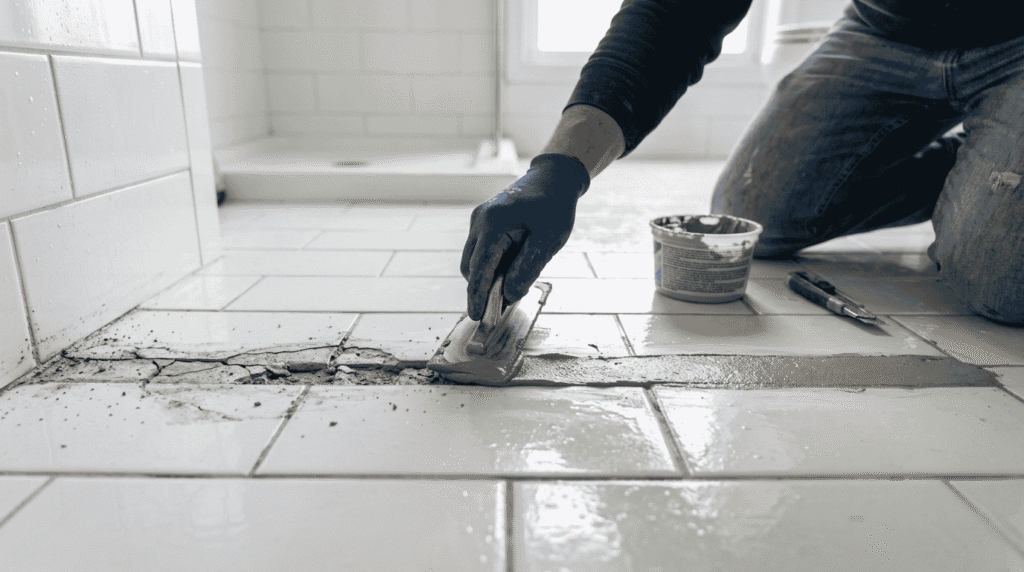
For serious problems, professional repair may be necessary. Early attention prevents further damage and helps maintain the strength and appearance of the flooring system.
Signs Grout Needs Repair
Visible cracks, crumbling areas, and missing grout indicate that repairs may be required. Loose grout can allow water penetration and weaken damaged joints over time.
When grout becomes deteriorated grout, cleaning methods may no longer provide effective results. Identifying these signs early helps determine the right repair requirement.
Regular inspection helps homeowners notice problems before they become severe. Timely repairs protect surrounding tiles and maintain better flooring performance.
Repair Options
Small problems may require small-area repair instead of complete replacement. Larger issues often involve regrouting, grout replacement, and removing old grout before applying new material.
Professional services may handle complex cases through professional restoration and tile repair. The correct solution depends on the amount of damage and condition of the grout.
Choosing the right repair method improves durability and restores the original structure. Proper work helps prevent future moisture problems and extends the life of tiled surfaces.
Professional Grout Cleaning
Professional cleaning is useful when regular methods cannot handle difficult conditions. Experts use deep cleaning techniques, specialized equipment, and experience to improve grout appearance and restore heavily affected areas.
Professional services can help with stubborn stains, large areas, and damaged grout that require advanced treatment. Proper methods support grout restoration while maintaining overall tile maintenance.
Hiring an expert service can save time when problems become complex. Professionals evaluate the surface condition and choose suitable solutions for effective cleaning results.
When To Hire Professionals
Professional help is recommended for deep stains, difficult surfaces, and large flooring areas where regular cleaning methods are ineffective. Experts use professional equipment for better results.
If you have damaged grout, professional solutions can provide proper restoration services. Complex cleaning situations often require specialized knowledge and careful handling.
Choosing experienced professionals helps protect the flooring investment. They can identify problems, apply suitable techniques, and improve grout condition safely.
FAQs
How Do You Clean Grout Between Floor Tiles?
Cleaning grout between floor tiles requires a proper grout cleaning method using suitable products. Apply a cleaning solution, scrub with a grout brush, then complete rinsing and drying.
Removing dirt removal and completing stain removal steps helps restore grout appearance. The correct technique depends on grout condition, tile type, and the level of buildup.
What Is The Best Homemade Grout Cleaner?
A homemade grout cleaner commonly uses baking soda and hydrogen peroxide as effective ingredients. These natural ingredients create a cleaning paste that helps treat grout stains.
This DIY solution can support grout brightening while removing surface marks. Proper application improves grout appearance without requiring extremely harsh cleaning methods.
Can Baking Soda Clean Grout?
Baking soda works as a natural cleaner because its texture provides a mild abrasive effect. It helps with grout cleaning, dirt removal, and basic stain treatment.
Applying it along grout lines creates a simple homemade solution for regular maintenance. This method is useful for removing light residue and improving grout appearance.
Can Vinegar Damage Grout?
Vinegar can affect certain surfaces because it is an acidic cleaner. On sensitive materials, it may create a chemical reaction that leads to grout damage.
Understanding tile compatibility is important before using vinegar. Natural stone surfaces require extra care, and proper surface protection supports better cleaning safety.
How Do You Make Grout White Again?
Making white grout look fresh again requires proper grout whitening methods that target discoloration and buildup. Products containing hydrogen peroxide, baking soda, and oxygen bleach can improve appearance.
Using suitable brightening products helps restore dull areas and supports effective stain removal. These solutions work by breaking down marks that affect the original grout color.
A consistent approach helps with grout restoration and keeps surfaces looking cleaner. Proper cleaning methods combined with regular care can maintain brighter grout lines over time.
How Often Should Grout Be Cleaned?
The grout cleaning frequency depends on usage, location, and environmental conditions. A proper maintenance schedule helps manage floor traffic, moisture, and ongoing dirt buildup.
Areas with higher activity require more frequent care. Regular cleaning based on tile location prevents residue accumulation and supports better grout care throughout the home.
Following a consistent routine keeps grout healthier and reduces difficult cleaning problems. Proper maintenance improves appearance while extending the life of tiled surfaces.
Does Steam Cleaning Damage Grout?
Steam cleaning is generally considered safe when performed correctly with the right equipment. A steam cleaner uses controlled heat and moisture to clean grout pores.
Before full treatment, test a small testing area to check the effect on the tile surface. This ensures the chosen cleaning method is suitable.
Proper technique helps maintain grout safety while improving cleanliness. Careful application prevents unnecessary issues and protects surrounding flooring materials.
Should Grout Be Sealed After Cleaning?
Applying grout sealing after cleaning adds a protective layer that improves moisture resistance and supports long-term maintenance. Proper sealing helps reduce dirt prevention problems.
A sealed surface provides better stain protection and keeps grout cleaner for longer periods. Regular grout maintenance becomes easier when the surface has protection.
Using a sealing routine after cleaning supports better durability and appearance. This simple step helps preserve grout quality and improves long-term care.